Selenium Grid Tutorial and Its Advantages
Ayush Mishra
Posted On: April 16, 2024
![]() 396713 Views
396713 Views
![]() 37 Min Read
37 Min Read
Automated testing plays a pivotal role in modern-day release cycles, as it speeds up the entire process of cross browser compatibility. Among all the test frameworks used to perform automated browser testing, Selenium is considered one of the best test automation frameworks.
Out of the entire Selenium project, Selenium Grid has been extremely helpful for web automation enthusiasts as it allowed them to perform parallel testing with Selenium.
In this Selenium Grid tutorial, we look at what Selenium Grid is and then explore some of its benefits using Selenium testing.
- What is Selenium?
- What is Selenium Grid?
- Why is Selenium Grid Used?
- Advantages of Selenium Grid
- When to Use Selenium Grid?
- Components of Selenium Grid
- How to Download and Setup Selenium Grid?
- Using Selenium Grid to Run Test Scripts
- How to Use Selenium Grid for Parallel Execution?
- Why Run Tests On a Cloud Grid?
- Difference Between Selenium Grid and Cloud Grid
- Running Tests on a Cloud Selenium Grid
- Shortcomings of Selenium Grid
- Frequently Asked Questions
What is Selenium?
Selenium is an open-source suite of tools and libraries used to automate the actions of the web application under test. Simply put, Selenium automates a web browser to behave like a user while allowing you to write test scripts in different programming languages, including Java, Python, Node.js, Ruby, PHP, C#, etc. Selenium-based tests are ideal for testing different types and versions of web browsers.
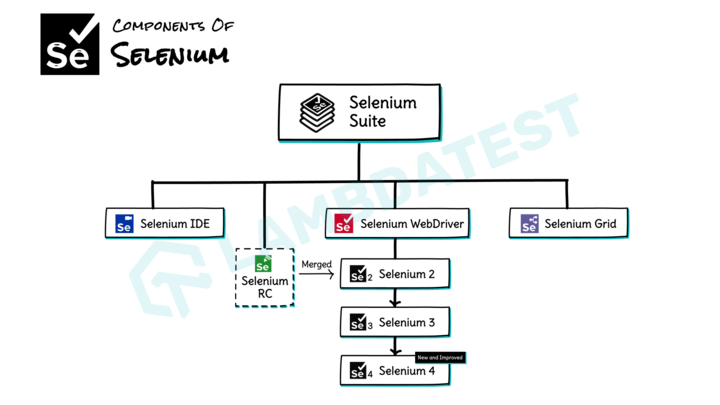
There are three components of Selenium.
- Selenium IDE: It is a browser extension tool that performs automated testing of web applications. It provides a user-friendly record-and-playback interface for creating automated test scripts.
- Selenium WebDriver: It is a group of open-source APIs used to automate web application testing. It enables developers and testers to programmatically interact with web elements and perform actions like clicking buttons, filling out forms, and navigating web pages.
- Selenium Grid: It is a distributed parallel testing tool. It enables parallel test execution across browsers, operating systems, and machines. It facilitates the efficient use of resources for large-scale testing.
 Note
NoteRun your Selenium test suites across 3000+ real browsers.Try LambdaTest Today!
What is Selenium Grid?
Selenium Grid is a smart proxy server that makes it simple to run tests simultaneously on several machines. It manages various browser setups and versions centrally (instead of separately in individual tests). Selenium Grid is a component of the Selenium framework that allows parallel testing against various browsers and combinations of operating systems through a client-server model.
In October 2021, Selenium 4 was released with significant updates over its predecessor, Selenium 3. In Selenium 4, the W3C WebDriver Protocol replaces the JSON Wire Protocol, which was used in Selenium 3. With this new version, the tester is no longer required to launch Hub and Node separately to perform automated testing. Instead, Selenium 4 integrates the Hub and Node into one jar file.
To know what changes have been made from Selenium Grid 3 to Selenium 4, refer to Selenium 3 vs Selenium 4.
Subscribe to the LambdaTest YouTube Channel. Get the latest updates on various automation testing tutorials covering Selenium Java, Selenium Python, and more.
Why is Selenium Grid Used?
Selenium Grid is primarily used to expedite the testing process by facilitating parallel execution of tests. This means multiple tests can run simultaneously across different browsers and operating systems, reducing the overall testing time. Furthermore, it provides a centralized hub for managing diverse testing environments.
This makes it a go-to solution for testing complex web applications, ensuring their functionality and performance across various user scenarios. Notably, Selenium Grid’s ability to support remote and distributed testing allows for a more flexible and scalable testing infrastructure, accommodating the evolving needs of web development teams.
The section below of this Selenium Grid tutorial outlines the benefits of using Selenium Grid, which is the main rationale for its utilization. By detailing the advantages of Selenium Grid, we aim to demonstrate why it is an essential tool for anyone seeking efficient and reliable automated testing solutions.
Advantages of Selenium Grid
Once you gain experience with programming in a particular language, you become more comfortable with the language, and the same is also applicable to a test framework. With more experience, adapting to a new programming language is not difficult, but you might need to spend more time debugging and solving issues that come after development.
This is where a test framework like Selenium scores high compared to the competing test frameworks that facilitate Selenium test automation.
In this section of the Selenium Grid tutorial, we will dive deep into some of the biggest positives of using Selenium Grid.
- Extensive Language Support: Starting with the first advantage of Selenium Grid. Let us consider a scenario where the predominant language used in your organization is Python, but the test framework they are using supports all prominent programming languages barring Python. Because the framework is powerful and developer-friendly, you do not want your engineers to reinvent the wheel by learning a new programming language.
- Dedicated Framework Support: You don’t have to worry about the framework when using the Selenium test framework. Programming languages supporting Selenium have associated test frameworks that ease the job of testing browser compatibility. This is one of the major advantages of Selenium Grid.
- Multi-Browser Support: Your customers may be using different versions of these web browsers hence, testing against those browser combinations is extremely important. As a web developer, there is no shying away from the critical task of testing the product functionalities on different versions and types of web browsers, i.e. cross browser testing.
- Multi-Operating System Support: The Selenium framework not only supports different web browsers but also supports popular operating systems like Windows, macOS, Linux, etc. As mentioned above, Selenium is platform-agnostic, in other words, porting a functional Selenium automation script from one platform to another requires minimal changes. The changes would ideally involve tweaking the Selenium WebDriver paths for the target operating system.
- Free and Open-Source: Selenium is open-source and completely free to use. The latest available version is Selenium 4.
- Parallel Test Execution (Local and Cloud-Based): Automation testing is performed so that the entire test process is accelerated and bugs/issues are unearthed quicker. This is how developers feel they perform serial testing, which takes a long time to complete.
- Powerful Reporting for Test Progress Tracking: Automation tests covering all the product functionalities also cannot be built in a single day. Test case development also happens in an incremental manner.
- Integration With CI/CD Pipeline: You might already know that it is not possible to achieve 100% test automation. This fact holds more ground with UI tests since they can be slow and brittle. However, it is still possible to perform automated browser testing in the Continuous Integration (CI)/Continuous Delivery (CD) pipeline.
- Better utilization of the resources in hand i.e. testers, test infrastructure, etc.
- Faster bug closure.
- Consistency in the planning and execution stages of testing.
- Android and iOS Mobile App Testing: Whether building a website or a web-based application, mobile device testing should always be a priority. Apart from cross browser testing on desktop, you must also ensure no usability issues on mobile devices.
- Code Reusability For Improved Maintenance: Code duplication is a big challenge, especially in cross-browser testing-related scenarios, since the code has to be tested against ‘N’ combinations of browsers (and their versions) on different operating systems. The size of the test code can unnecessarily increase if it is not maintained properly.
- Vibrant Developer and Support Community: It does not matter whether you are a pro developer or a newbie in programming, you are bound to encounter technical roadblocks when writing code.
- Keyboard and Mouse Simulation: As a tester, you may witness scenarios where the functionality or behavior changes from one browser to another. If an old web browser version is used, there will be many functionalities that might not work as per your expectations. This is where testing for browser compatibility plays a critical role as you can have a fallback mechanism in case your website/web application is accessed from such families of browsers.
- Timely Product Updates: You would have come across many open-source projects that hit a dead-end just because the community did not adopt them, leading to delayed/no product updates. Selenium is backed by a passionate community of users who support other Selenium Grid users via answering on technical forums.
- Optimum Hardware Usage: Each software operation requires a CPU for execution, and developers leave no stone unturned when coming up with code that is optimized for CPU consumption. Irrespective of whether cross browser testing is performed on local infrastructure or cloud-based infrastructure, code optimization is very important, or the execution speed will be adversely impacted.
- Automation of Browser Interactions: Many browser compatibility testing scenarios require interactions with the browser buttons along with keyboard and mouse interactions. Selenium framework has features like implicit/explicit wait, wait for JavaScript to load, etc., for handling flaky tests. There are many ways to tackle these challenges in Selenium automation testing.
- No External Server Requirement: Selenium test automation does not require any investment of additional servers if you are planning to test on local machines. The Selenium WebDriver is sufficient to execute browser compatibility-related test cases.
- Cloud-Based Selenium Test Automation: What if you want your team to perform compatibility testing on enormous combinations of web browsers, operating systems, and devices? It certainly won’t be possible for them to perform manual cross browser testing for so many combinations.
When a software engineer evaluates a new test framework, ‘programming language support’ is the first to be looked into. This is where the Selenium test framework has a big upper hand as it supports the most popular programming languages like Java, JavaScript, Python, Perl, etc. Hence, Selenium test automation is preferred by experienced programmers as all they have to do is learn the nuances of Selenium Grid automation and implement it for their project.
The only learning curve that is involved here is getting to know how to use the appropriate framework with Selenium. Once you pass that learning phase, you will be in a position to use Selenium test automation for developing modular and scalable test cases/test suites for your project.
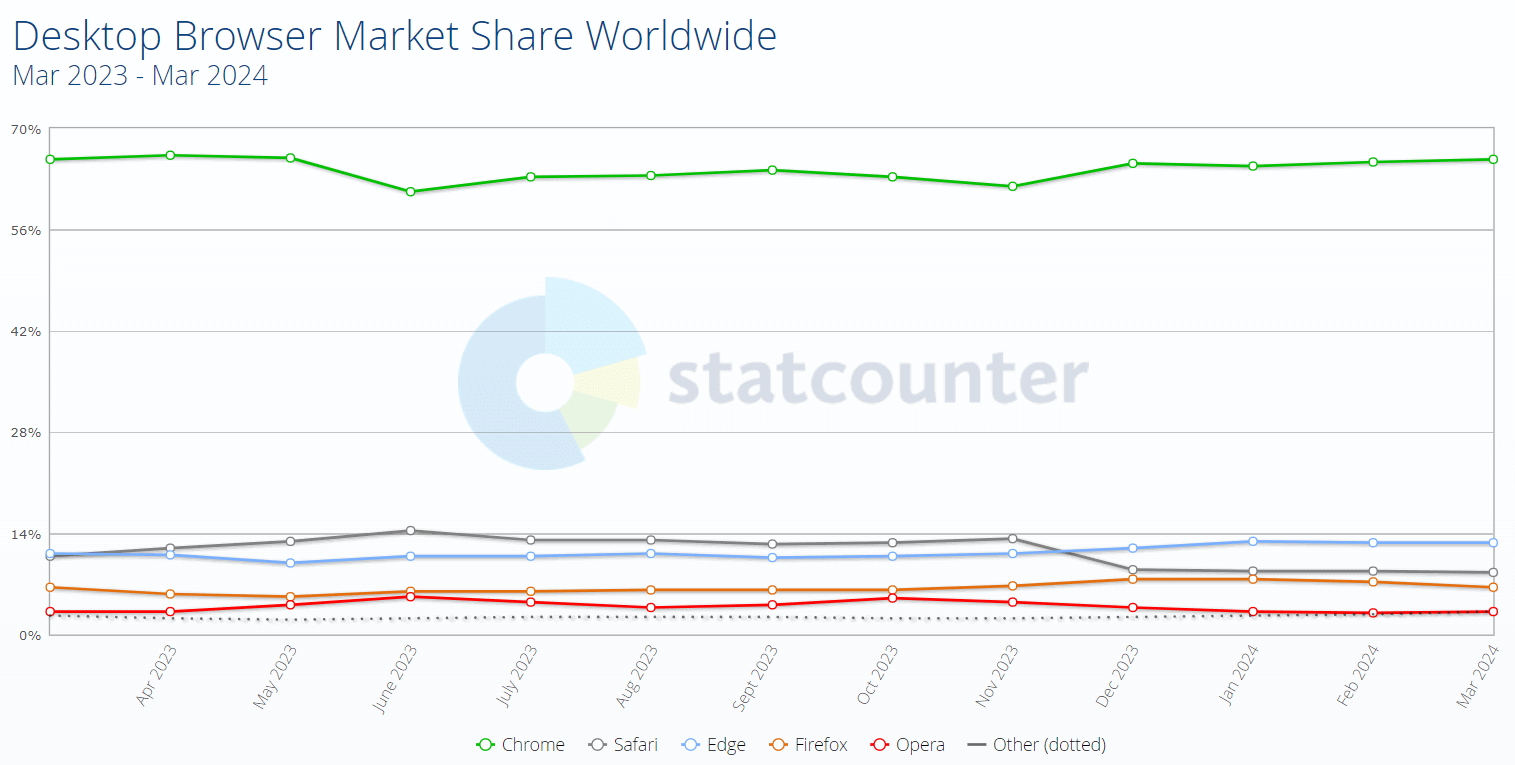
Shown below is the market share of the web browsers used on desktop machines, according to StatCounter. The Selenium framework supports all popular web browsers like Chrome, Firefox, Safari, Microsoft Edge, Opera, etc.
The Selenium framework is designed in a modularized manner hence, any interaction/interfacing with the underlying web elements on a web page happens via the Selenium WebDriver. Selenium WebDriver is a key component that acts as a mediator between the test suites/test cases and the web browser on which testing is performed.
This enables you to use the same test script on different versions of the same browser or different web browsers. All you’ll have to do is instantiate a WebDriver instance for the browser on which you intend to perform automated testing.
In most scenarios, the source code that contains the business logic (i.e. the one that is responsible for interacting with the web locators) does not involve any changes. This enables testers to write effective test cases by dividing the business logic into code that can work seamlessly across different platforms/operating systems.
An open-source project requires active participation from the community else it may witness a steady decline. This definitely is not the case with the Selenium framework, as it has a vibrant community of users and developers who are active in different development forums.
What if the automation tests were performed parallelly instead of serially? This is where Selenium test automation can be instrumental, as it facilitates parallel test execution.
Selenium framework enables testing on local machines and local Selenium Grid, through which you can perform automated browser testing on a select few combinations of browsers and operating systems. Parallel test execution on the Selenium Grid enables reduced test execution time with much better test coverage.
Hence, it becomes important to track the progression of your test cases. Keeping track of the same can be a daunting task, especially for automated browser testing-related scenarios, since you want to perform testing on browser combinations that matter the most!
Powerful reporting tools become even more effective when using shift-left testing since the testing team works in close contact with the development team, and detailed reports can help developers identify potential issues in the software.
Test reports help in minimizing the time required for the maintenance of the test data and test results. Third-party frameworks can be integrated with Selenium to generate detailed test reports that outline the overall test execution flow along with the input data and test results.
PyUnit (for Python) has a supporting module named HTMLTestRunner that facilitates the creation of test reports. Along similar lines, the NUnit framework (in C#), TestNG framework (for Java), etc., facilitate the creation and maintenance of test reports.
Some of the core benefits of using automation testing in the CI/CD pipeline are:
The Selenium framework can be integrated with popular CI/CD tools like Jenkins, Docker, etc., thereby leveraging the advantages of continuous testing. This enables the developers to use Selenium test automation to verify cross-browser-related scenarios.
Another advantage of Selenium Grid is that along with the associated frameworks like NUnit, pytest, etc., it can be used for testing on different combinations of browsers and operating systems for predominantly desktop.
To ensure no cross browser compatibility issues on mobile devices, you must perform automated browser testing for your website/web application using Appium. Appium has features that make testing of native, hybrid, and mobile web apps easy.
Appium uses the Selenium WebDriver which is instrumental in driving the testing of Android, iOS, and Windows apps. Like Selenium, Appium also supports major programming languages. If you are well-versed with the Selenium framework, you can start with Appium with fewer hassles.
When selecting a cloud-based browser compatibility platform, you should select a platform that provides Selenium test automation and Appium automation testing facility on their Grid so that you do not have to knock on multiple doors!
Irrespective of the test framework being used, the developers should make a conscious effort to avoid code duplication, thereby ensuring improved portability and maintenance of the test code. Selenium Grid has features/practices like code refactoring, regrouping, Page Object Model (POM), etc. that enable minimizing code duplication and allow coming up with tests that leverage code reusability. This frees up the resources to perform other important tasks rather than cleaning up a messy and un-maintainable piece of source code.
This is when you require support from the technical community/technical forums, as that is the perfect platform to get answers to all your technical issues. As Selenium test automation is widely used by consumer tech startups and enterprises, it has a vibrant support ecosystem.
You can also get your answers by visiting forums like Stack Overflow with many questions under the Selenium and Selenium WebDriver tags. Apart from this forum, there is Selenium Slack Channel, Selenium user group, etc.
Below are some of the relevant official coordinates where you can get support on Selenium-related issues online:
As the support of Selenium is driven by its passionate users, there are regular bug fixes and upgrades to the project. Hence, even a newbie in Selenium test automation can get started by seeking relevant support from the community.
We cannot execute a manual test to verify the behavior on so many browsers, operating systems, and devices. Hence, automated browser testing using the right test automation framework can ease that task.
Using the Selenium Grid, you can mimic keyboard and mouse simulations, fill username in the text box, etc. Whether you are using Java, JavaScript, Python, or any other programming language supported by Selenium, each has classes/packages to automate user interaction-based scenarios.
The first release of the Selenium framework was 2.4, and the latest version is 4.19.1. To gather feedback, there are intermittent Alpha releases, and a stable version of Selenium is not released until all the reported issues are fixed.
Since the Selenium framework gets frequent product updates, there is a lot of enthusiasm amongst the community before a new release is announced!
Selenium test automation scores brownie points regarding optimum CPU utilization as it requires less hardware when compared to other automation testing tools etc.
Selenium enables automation of complicated browser interactions like clicking the back button, refresh button, etc., which can be useful in websites that do not store cookies or data in the cache. There are very few open-source and commercial browser compatibility testing tools that provide these features, which are very relevant in the automation testing of websites/web applications.
When you want to perform thorough automated browser testing on your web application, you have the option of executing your tests on a remote machine that acts as a Selenium server or opting for a more scalable approach like moving manual testing to the Selenium Grid cloud.
A cloud-based Selenium Grid facilitates your team in performing parallel testing on a remote Selenium Grid, which is essentially a Selenium Grid on the cloud. AI-powered test orchestration and execution platforms like LambdaTest enable automation testing at scale on a remote test lab of 3000+ real browsers and operating systems online. With LambdaTest, test case implementation for local Selenium Grid can be effortlessly ported to make it with the Selenium Grid.
When to Use Selenium Grid?
Selenium Grid can greatly improve automated testing processes. It’s important to know when to use Selenium Grid to optimize your testing process and ensure you’re getting the most out of your test coverage.
Here are some key situations where Selenium Grid can make a difference:
- Cross-Browser and Cross-Platform Testing: One of the primary reasons to use Selenium Grid is to conduct tests across various browsers, operating systems, and machines simultaneously. This approach allows you to validate the compatibility of your application with different browser-OS combinations, ensuring a seamless user experience for a diverse audience.
- Parallel Test Execution for Time Efficiency: It offers an advantage in terms of time efficiency. By configuring Selenium Grid to run multiple tests concurrently, you can significantly reduce the time required to execute your test suites. For instance, if you set up Selenium Grid to run four tests simultaneously, you can complete your entire test suite approximately four times faster than running tests sequentially.
For example, if your web application needs to support users on Chrome, Firefox, Safari, and Edge, running tests concurrently on these browsers through Selenium Grid ensures comprehensive validation and helps identify and address any cross-browser compatibility issues.
This time-saving aspect becomes especially crucial in today’s fast-paced development cycles, enabling quicker feedback on code changes and accelerating the release process.
Scalability for Large-Scale Testing: Selenium Grid becomes an essential tool for scalable test automation as your test suite grows in complexity and size. It allows you to distribute tests across multiple machines, facilitating parallel execution and accommodating large-scale testing scenarios.
Whether you’re dealing with an extensive regression suite or testing across various environments, Selenium Grid ensures that your test infrastructure can scale effectively to meet the demands of your scaling application.
Components of Selenium Grid
Various components of the Selenium Grid serve different purposes. In this section of the Selenium Grid tutorial, we will look at each component and its usage.

The key components of Selenium Grid are:
- Router: It serves as the initial point of contact for the Grid, receiving all incoming requests from external sources and then directing them to the appropriate component for processing.
- Distributor: The Distributor in Selenium Grid manages Node registrations and capabilities tracking. It verifies node existence upon registration events and updates the Grid model accordingly. Additionally, it processes pending new session requests from the new Session Queue, assigning suitable nodes for session creation and maintaining session-node relations in the Session Map.
- Session Map: It acts as a repository, storing the connection between the Session ID and the specific Node where the session is in progress. It aids the Router in efficiently directing requests to the correct Node.
- Session Queue: It is a component in the system that holds incoming session requests in a specific order, known as First-In-First-Out (FIFO). It has customizable settings for managing request timeouts and intervals for retrying requests. This queue ensures organized processing of session requests and helps maintain efficient resource allocation within the system. A request is automatically rejected and removed from the queue if it exceeds its designated timeout period.
- Node: It is responsible for executing automated tests within a distributed network. Nodes are part of a grid of interconnected machines, each with distinct configurations, and they must be registered with the Distributor, providing their specific configurations. This registration enables the grid to assign test requests that match those configurations to the appropriate node for execution.
- Event Bus: It serves as a path for communication between the Nodes, Distributor, New Session Queue, and Session Map. The Grid avoids costly HTTP calls by conducting most of its internal communication through messages. The Event Bus should be launched initially when the Grid is first started in fully distributed mode.
Before proceeding with the execution of test scripts on Selenium Grid. Let’s go through the setup process to ensure everything is properly configured.
How to Download and Setup Selenium Grid?
In this section of the Selenium Grid tutorial, we will look at how to download and set up Selenium Grid.
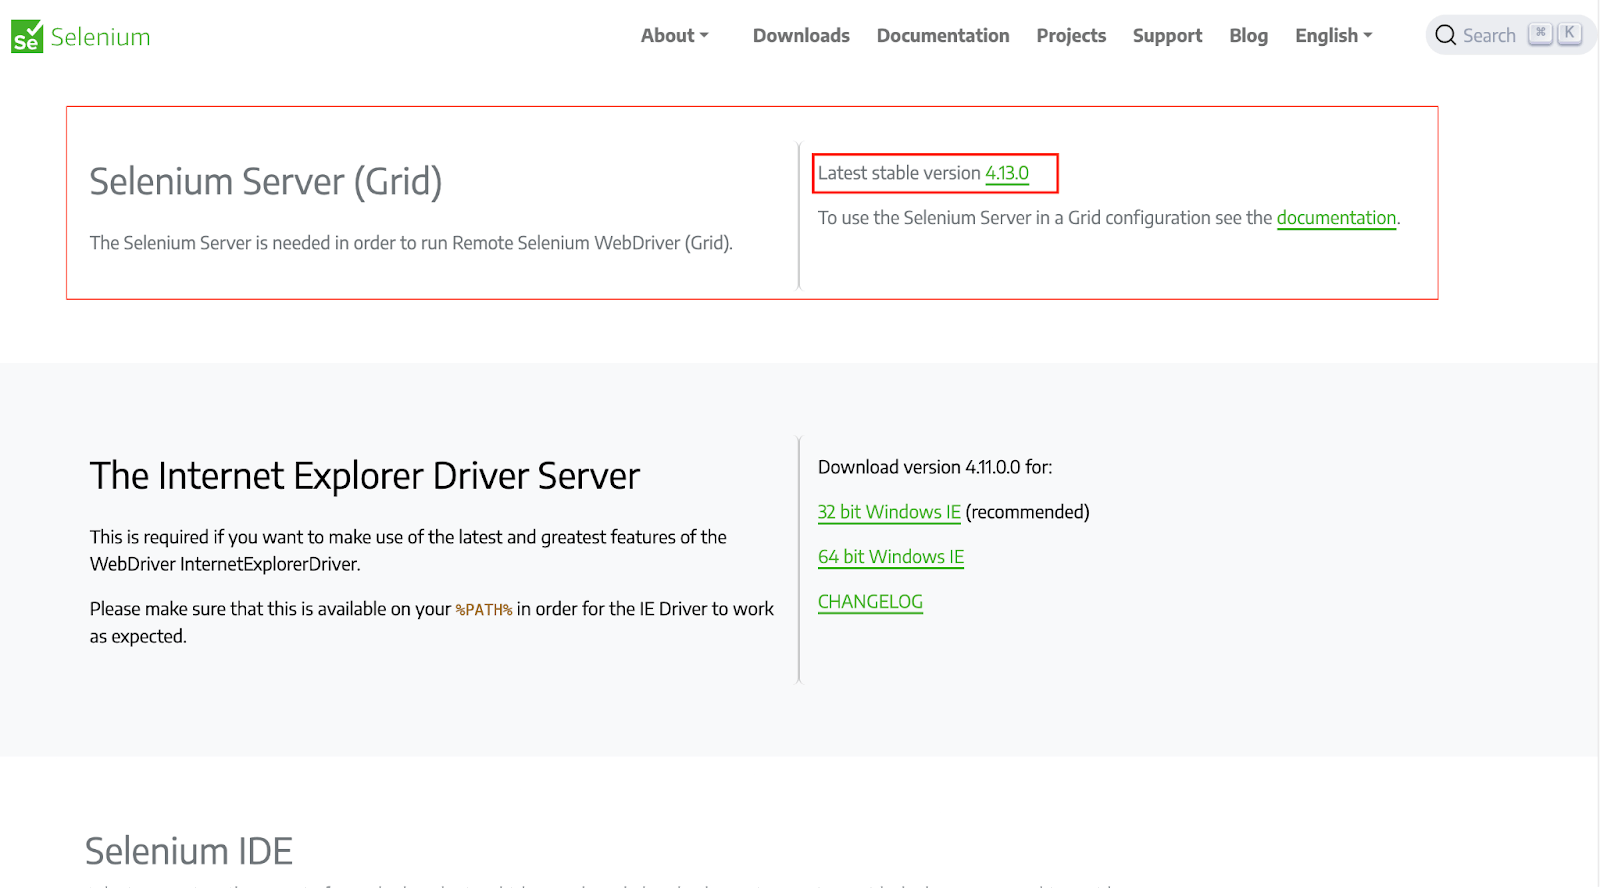
The latest version of Selenium Grid is 4.19.1 as of the 15th of April 2024. For demonstration, we will use Selenium Grid version 4.13.0. However, you can use any of the versions of Selenium Grid as per your choice. It offers the advantage of the latest technologies to facilitate scaling up while letting users perform Selenium test automation.
Prerequisites:
To set up Selenium Grid, we will need to ensure we have the following prerequisites:
- Install Oracle JDK (Java Development Kit) or OpenJDK (Open Java Development Kit).
- Install browsers installed on your system.
- Install Eclipse IDE or IntelliJ IDE for running test scripts. You may consider checking out this blog on downloading Selenium.
- Set up the TestNG framework in the IDE for running test scripts.
- Download and extract the Selenium Server (Grid) JAR files to start with the Selenium Grid.
Selenium Grid can be set up in the following modes:
- Standalone
- Hub and Node
- Distributed
We will now see the working of Selenium Grid in each mode.
Standalone
Standalone is a single-node Grid where all of the Grid components are running on the same machine. This is the easiest way to get started with Selenium Grid but also the least scalable and flexible. When we run a Grid in Standalone mode, it provides a complete and operational Grid environment using just one command, all within a single process.
The command to start the Selenium Grid in standalone mode:
|
1 |
java -jar selenium-server-<version>.jar standalone |

Note: Replace <version> with the latest version of the Selenium Server (Grid) file. Selenium Manager will configure the drivers automatically if you add –selenium-manager true.
Hub and Node
The Hub and Node roles in Selenium Grid are essential for combining machines in a single Grid, including varying operating systems and browser versions. They establish a centralized entry point for running WebDriver tests across different environments.
Hub
The first step of a Selenium Grid setup would be to create a Hub. Open a command prompt or terminal and navigate to the directory where the Selenium Standalone Server jar file is saved.
Run the below command to start the Hub.
|
1 |
java -jar selenium-server-<version>.jar hub |

Note: Replace <version> with the latest version of the Selenium Server (Grid) file.
Node
Open a command prompt or terminal in the node machine and navigate to the directory where we have created our project.
|
1 |
java -jar selenium-server-<version>.jar node |

Note: Replace <version> with the latest version of the Selenium Server (Grid) file.
You may face an error when adding –selenium-manager true, which is used for the automatic setup of the driver for Selenium.
Selenium Manager is a command-line utility written in Rust that offers automated driver and browser administration for Selenium. We don’t need to download it, add anything to the code, or take any other action to use it because Selenium bindings already use it by default.
Run the below command to start the node.
|
1 |
java -jar selenium-server-<version>.jar node --selenium-manager true |

Note: Replace <version> with the latest version of the Selenium Server (Grid) file.
We must specify the port to start the node if we want to run more than one node on a single machine. Suppose we have two nodes; we will use ports 5555 and 7777 to start both nodes.

Node 1:
|
1 |
java -jar selenium-server-<version>.jar node --port 5555 |
Node 2:
|
1 |
java -jar selenium-server-<version>.jar node --port 7777 |
Distributed
In a Distributed Grid setup, each component is initiated independently, preferably on distinct machines, for optimized performance and resource utilization.
- Event Bus: It facilitates communication among various components within the Grid components. The default ports of Event Bus are 4442, 4443, and 5557.
- New Session Queue: It places new session requests into a queue, which the Distributor will later check and process. The default port is 5559.
- Session Map: It links Session IDs to the specific Node where the session is active. The default port no. is 5556. The command to start the Session Map is:
- Distributor: This step involves identifying the suitable node for test execution. The default port no. is 5553. The command to start the distributor is:
- Router: It actively monitors incoming new session requests. The default port no. is 4444. The command to start the router is:
- Node: The test machine is where the actual test execution occurs. The default port no. is 5555. The command to start the node is:
|
1 |
java -jar selenium-server-<version>.jar event-bus --publish-events tcp://<event-bus-ip>:4442 --subscribe-events tcp://<event-bus-ip>:4443 --port 5557 |
|
1 |
java -jar selenium-server-<version>.jar sessionqueue --port 5559 |

Note: Replace <version> with the latest version of the Selenium Server (Grid) file. Also, don’t forget to mention the port number represented by XXXX.
|
1 |
tcp://<event-bus-ip>:4442 --subscribe-events tcp://<event-bus-ip>:4443 --port 5556java -jar selenium-server-<version>.jar sessions --publish-events |

Note: Replace <event-bus-ip> with the IP address of the event bus. Also, don’t forget to mention the port number represented by XXXX.
|
1 |
java -jar selenium-server-<version>.jar distributor --publish-events tcp://<event-bus-ip>:4442 --subscribe-events tcp://<event-bus-ip>:4443 --sessions http://<sessions-ip>:5556 --sessionqueue http://<new-session-queue-ip>:5559 --port 5553 --bind-bus false |

Note: Replace <event-bus-ip> with the IP address of the event bus, <sessions-ip> with the IP address of the session IP address, and <new-session-queue-ip> with the IP address of the session queue. Also don’t forget to mention the port number, represented by XXXX.
|
1 |
java -jar selenium-server-<version>.jar router --sessions http://<sessions-ip>:5556 --distributor http://<distributor-ip>:5553 --sessionqueue http://<new-session-queue-ip>:5559 --port 4444 |

Note: Replace <distributor-ip> with the IP address of the session queue. Also don’t forget to mention the port number, represented by XXXX.
|
1 |
java -jar selenium-server-<version>.jar node --publish-events tcp://<event-bus-ip>:4442 --subscribe-events tcp://<event-bus-ip>:4443 |

Now, we are aware of how to set up the Selenium Grid. Let’s explore how to use each command by running test scripts.
Using Selenium Grid to Run Test Scripts
In this section of the Selenium Grid tutorial, we will see different ways to run the test on Selenium Grid in detail.
Test Scenario
|
We will see the implementation to run the test on Selenium Grid.
Code Walkthrough:
Create a package with the name project.
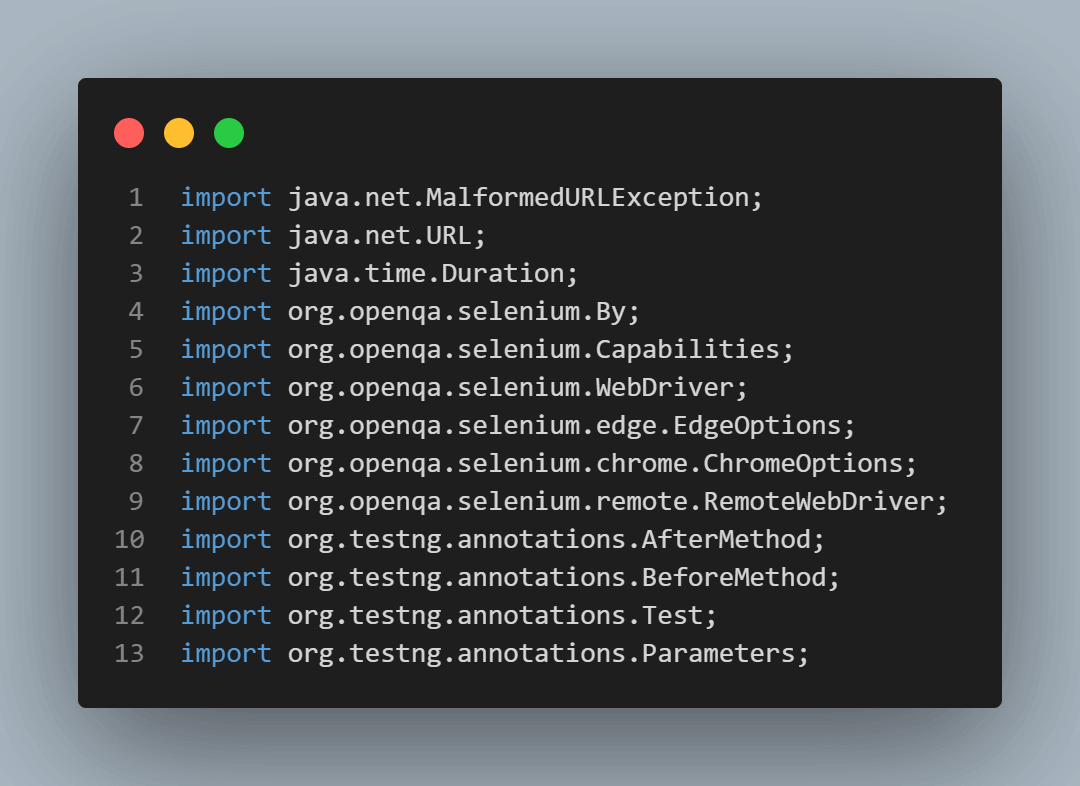
Import all the necessary libraries to perform parallel testing using Selenium Grid.
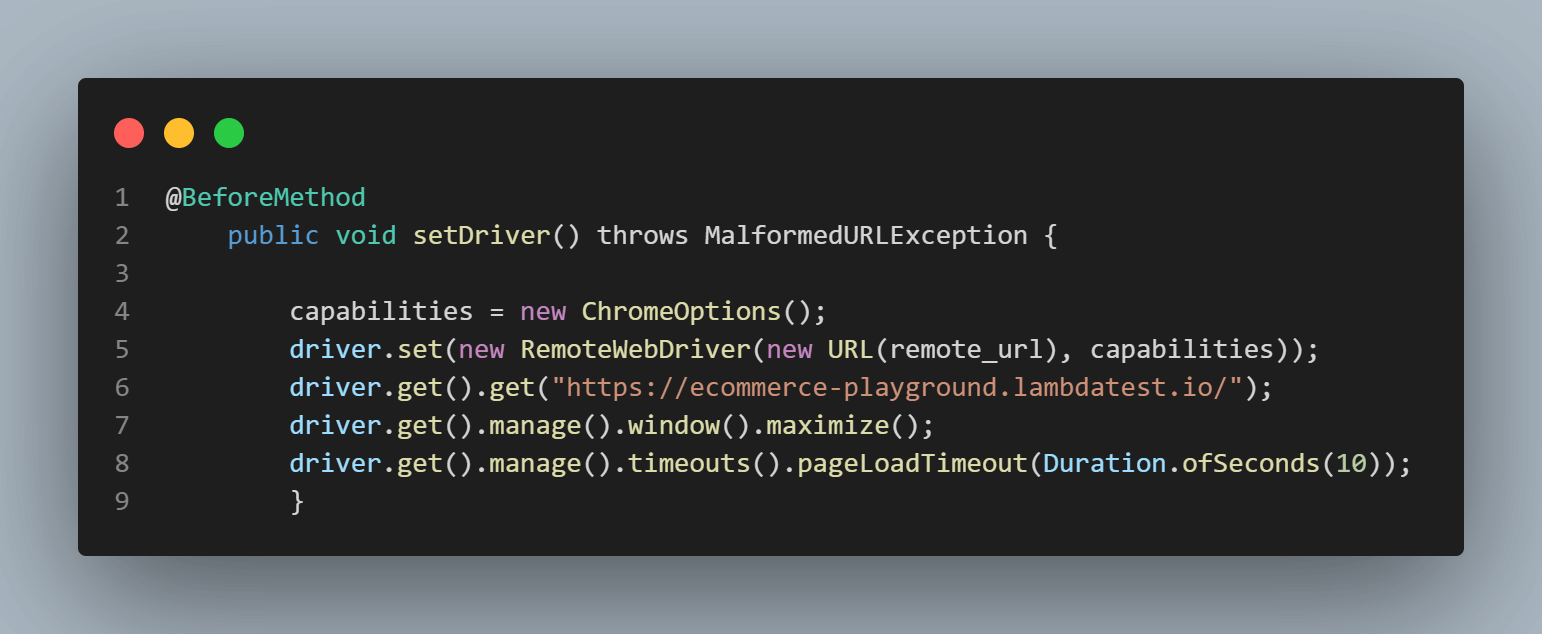
The code under the @BeforeMethod annotation in TestNG sets the browser capabilities for the Chrome browser. A RemoteWebDriver instance is established and executed on Selenium Grid, with the Hub address set to http://localhost:4444. The driver navigates to the LambdaTest eCommerce Playground website, maximizes the window, and manages the page load timeout.
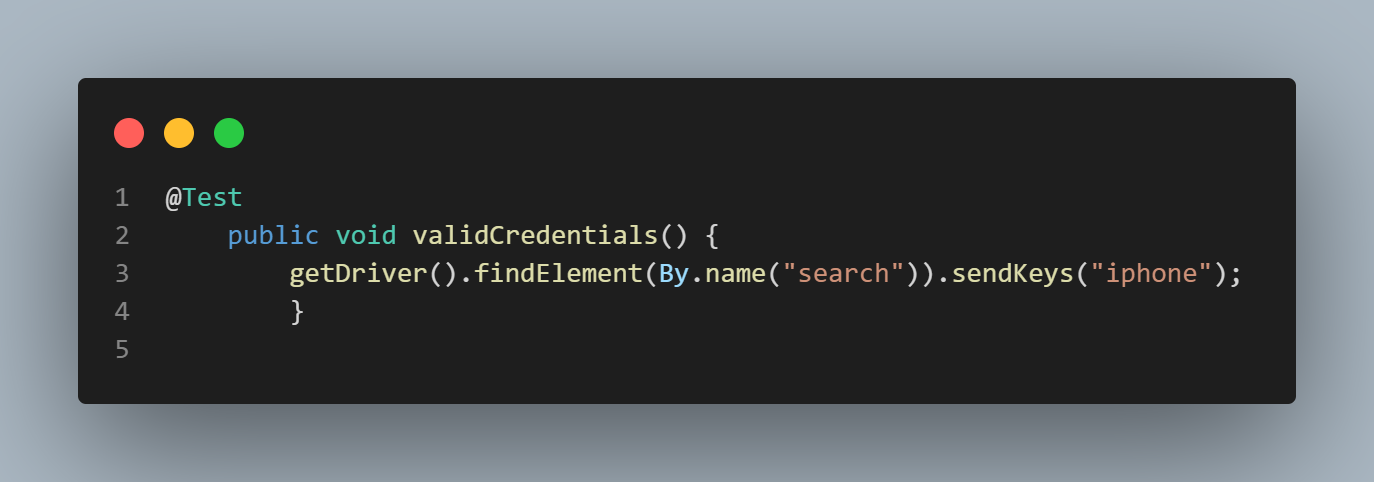
The test case is executed under @Test annotation. Using the CSS element, locate the search bar and send the key iphone.
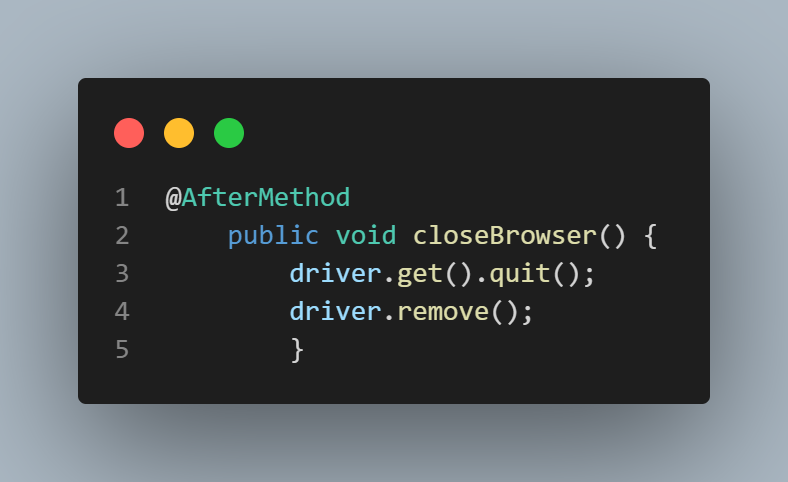
The code under the @AfterMethod annotation is used to quit the browser.
Run the test with the same code on distinct Grid configurations, encompassing Standalone Selenium Grid, Hub and Node Selenium Grid, and Distributed Selenium Grid.
Standalone Selenium Grid
When operating in Standalone mode, the Selenium server handles all tasks within a single process.
To initiate it, simply execute the following command in the terminal:
|
1 |
java -jar selenium-server-4.13.0.jar standalone --selenium-manager true |
Selenium Grid will automatically identify the web browsers present on the system. Run the above command to start the standalone Grid.
Console Output:

The server is actively listening at http://localhost:4444/, matching the address specified in the configuration of the Remote WebDriver. The WebDriver for Chrome is successfully registered within the Grid when the test code is executed.
Run the test code to check whether the test case passes or fails.
Output:

Also, get the Session ID on the command line terminal and confirm whether the session is created by visiting http://localhost:4444/status.
Console Output:

You can see the session in the above output; it is the same as that created on http://localhost:4444/status.
|
1 2 3 4 5 6 7 8 9 10 11 12 13 14 15 16 17 18 19 20 21 22 23 24 |
"sessionId": "e62abeb4ff22c5a162a95ec896df7962", "start": "2023-09-29T03:56:01.197573200Z", "stereotype": { "browserName": "chrome", "goog:chromeOptions": { "args": [ "--remote-allow-origins=*" ] }, "platformName": "Windows 10" }, "uri": "http:\u002f\u002f192.168.43.189:4444" }, "stereotype": { "browserName": "chrome", "goog:chromeOptions": { "args": [ "--remote-allow-origins=*" ] }, "platformName": "Windows 10" } } |
Hub and Node Selenium Grid
Selenium test automation uses the Grid and comprises two key components, namely the Hub and multiple Nodes. If the Hub and Nodes are hosted on the same machine, you can initiate them using the provided commands:
Run the following command to start the Hub:
|
1 |
java -jar selenium-server-4.13.0.jar hub |
Console Output:

Run the following command to start the Node.
|
1 |
java -jar selenium-server-4.13.0.jar node --selenium-manager true |
Once the Hub is initiated, it establishes XPUB and XSUB sockets that bind to tcp://0.0.0.0:4442 and tcp://0.0.0.0:4443, respectively.
Console Output:

After initiating the node with the provided command, it connects to the same address (tcp://0.0.0.0:4442 and tcp://0.0.0.0:4443). The option –selenium-manager true automatically identifies the Selenium WebDriver available in the system. Upon instantiating the Chrome WebDriver instance, it promptly registers itself on the Grid.
Console Output:

Now, again, if we run the test code, we will see the session with the Session ID was created.
Console Output:

We can again see the session in the above output; it is the same as created on http://localhost:4444/status.
|
1 2 3 4 5 6 7 8 9 10 11 12 13 14 15 16 17 18 19 20 21 22 23 24 |
"sessionId": "b087597624261818493b12f6b2f12945", "start": "2023-09-29T04:18:31.669923700Z", "stereotype": { "browserName": "chrome", "goog:chromeOptions": { "args": [ "--remote-allow-origins=*" ] }, "platformName": "Windows 10" }, "uri": "http:\u002f\u002f192.168.43.189:4444" }, "stereotype": { "browserName": "chrome", "goog:chromeOptions": { "args": [ "--remote-allow-origins=*" ] }, "platformName": "Windows 10" } } |
Distributed Selenium Grid
In this section of the Selenium Grid tutorial, we will run the test case in Distributed Selenium Grid. The following steps will start the Selenium Grid in a distributed manner.
Step 1: Start the Event Bus
The command to start the Event Bus is:
|
1 |
java -jar selenium-server-4.13.0.jar event-bus --port 5557 |
Console Output:

Step 2: Start the Session Queue
The command to start the Session Queue is:
|
1 |
java -jar selenium-server-4.13.0.jar sessionqueue --port 5559 |
Console Output:

Step 3: Start the Sessions Map
The command to start the sessions map is:
|
1 |
java -jar selenium-server-4.13.0.jar sessions |
Console Output:

Step 4: Start the Distributor
The command to start the Distributor is:
|
1 |
java -jar selenium-server-4.13.0.jar distributor --publish-events tcp://<event-bus-ip>:4442 --subscribe-events tcp://<event-bus-ip>:4443 --sessions http://<sessions-ip>:5556 --sessionqueue http://<new-session-queue-ip>:5559 --port 5553 --bind-bus false |
Note: Specify the <event-bus-ip> , <sessions-ip>, <new-session-queue-ip> from the above commands.
Console Output:

Step 5: Start the Router
The command to start the Router is:
|
1 |
java -jar selenium-server-4.13.0.jar router --sessions http://<sessions-ip>:5556 --distributor http://<distributor-ip>:5553 --sessionqueue http://<new-session-queue-ip>:5559 --port 4444 |
Note: Specify the <sessions-ip>, <distributor-ip>, <new-session-queue-ip> from the above commands.
Console Output:

Step 6: Start the Node
The command to start the Node is:
|
1 |
java -jar selenium-server-4.13.0.jar node --publish-events tcp://<event-bus-ip>:4442 --subscribe-events tcp://<event-bus-ip>:4443 |
Note: Specify the <event-bus-ip> from the above commands.
Console Output:

Now, run the test scripts, and we will see the session with the Session ID was created.

Now that we have understood how to run test scripts in Selenium Grid, let’s go through how to use Selenium Grid for parallel execution.
How to Use Selenium Grid for Parallel Execution?
We will run an automation script demonstrating the parallel execution on Selenium Grid. This script would run parallel on Chrome and Microsoft Edge, registered on different ports, and attached to a single Hub. We can do parallel testing on multiple browsers, such as Chrome and Microsoft Edge.
There are two steps to set up Selenium Grid for parallel test execution.
- Create a Hub.
- Define the Nodes and connect to that Hub.
Note: Ensure the Hub and Nodes run on a local host before parallel testing, as seen in the above section of this Selenium grid tutorial.
We are using Eclipse IDE for testing. We will first create a test code to establish a connection to the Selenium RemoteWebDriver to start a RemoteWebDriver client. We achieve this by referring the URL to the location of the server hosting our tests. We specify the desired capabilities to alter our settings.
The example of creating a RemoteWebDriver object below points to the remote web server where our tests run on Chrome and Edge. To pass the browser names to the tests, we use the @Parameters annotation.
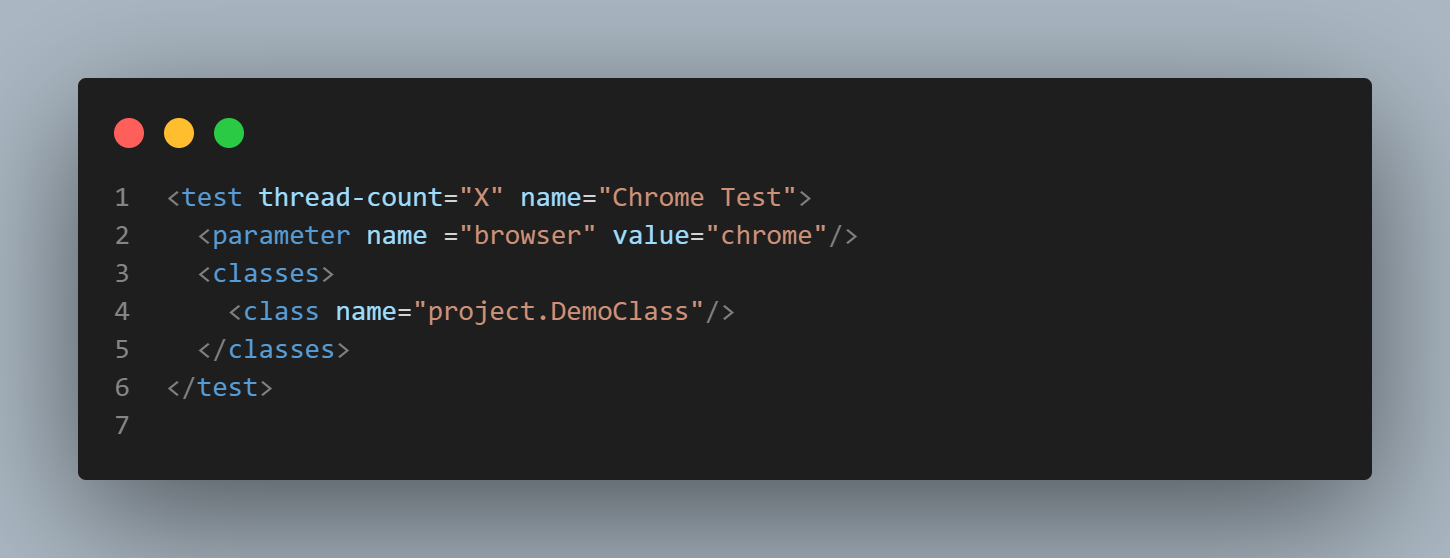
The above DemoClass.java file is configured with the XML file, includes the values of parameters passed in the DemoClass.java file, and also helps create a suite of different classes that would run in a parallel manner.
Run the testng.xml file by right-clicking on it and selecting Run AS > TestNG Suite.
Output Screen:
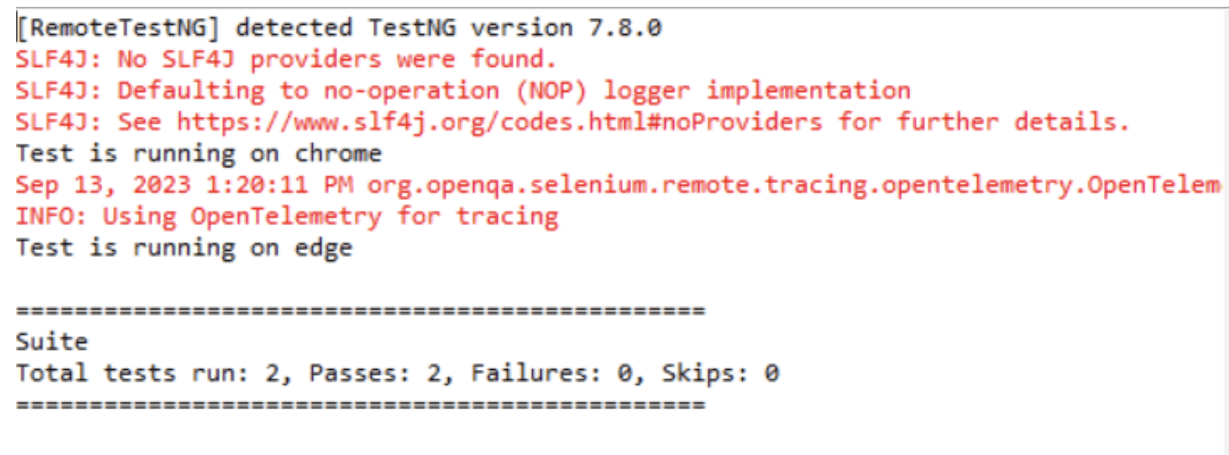
Code Walkthrough:
Create a class DemoClass inside the package project, and for thread safe execution, use ThreadLocal Map. Also, create a variable that will store the url of the Hub.

Create a setDriver() to set the capabilities according to the browser, navigate to the testing website, and maximize the window.
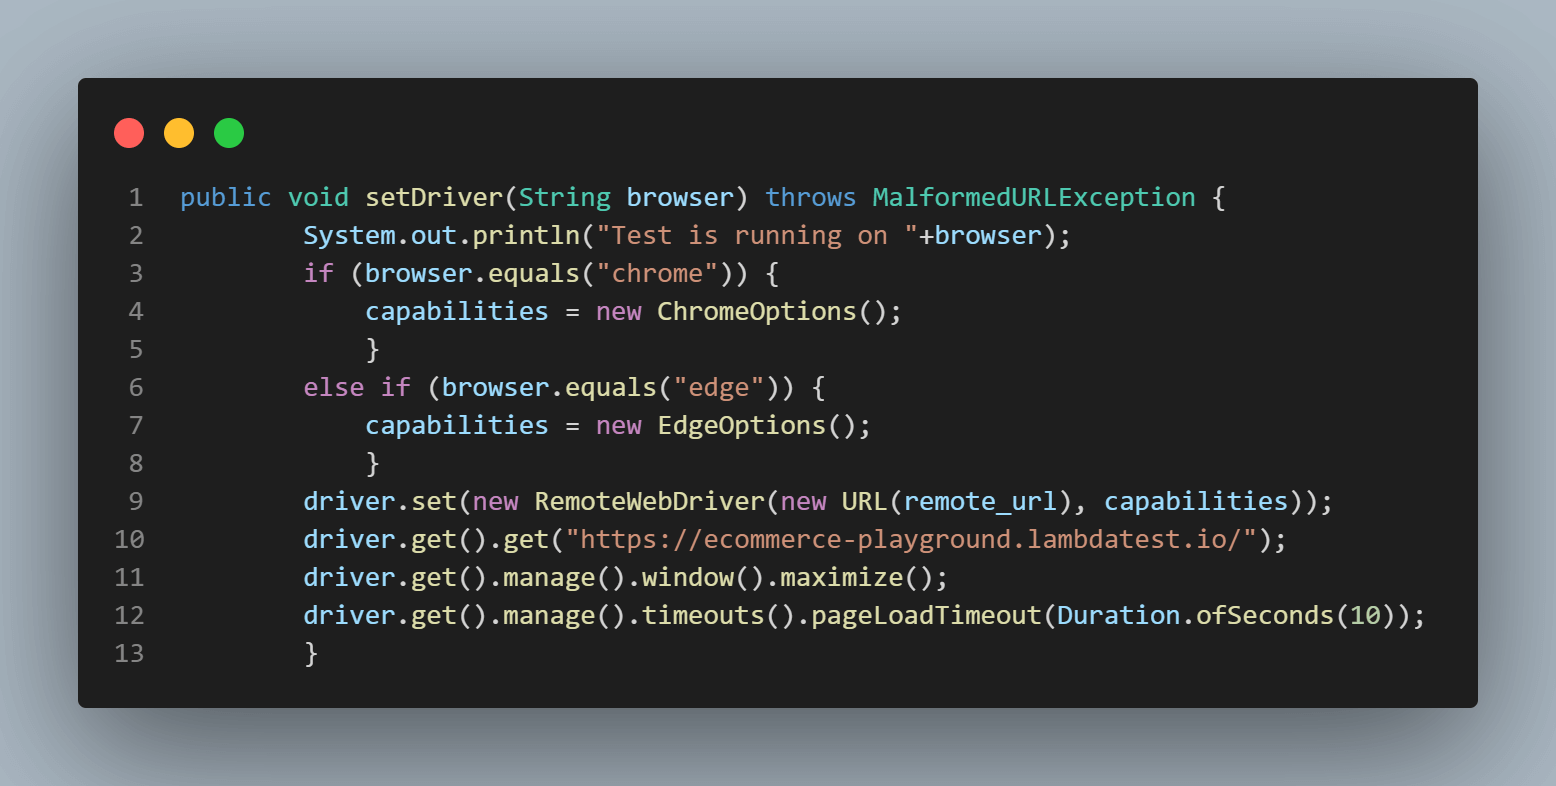
According to the capabilities of the system and the testing requirements, thread-count in the testng.xml file enables the handling of X numbers of parallel threads for the given tests.
Before proceeding to parallel execution on the Cloud Grid. We will see why it is important to know the need for a Cloud Grid for running multiple test scripts.
Why Run Tests On a Cloud Grid?
Suppose we want to run multiple test scripts so they can be run on multiple browsers currently installed on the test machine. If we try running our test on the Chrome 112 version and only have the Chrome 116 version installed on our test machine, our test script will show an error. This same scenario occurs when we opt for a different operating system compared to the operating system of our test machines.
In addition, investing in new Windows and macOS environments is quite expensive every time a new OS is launched. So, we may want to perform automation testing on different browsers, browser versions, and operating systems. In that case, we mainly use Cloud Grid.
According to the Future of Quality Assurance Survey by LambdaTest, nearly half of organizations still stick to local machines or in-house grids for their test automation. This preference comes with its own set of challenges, though. Dealing with high flakiness, scalability problems, and spending heaps of time on maintaining test infrastructure can put a strain on teams.
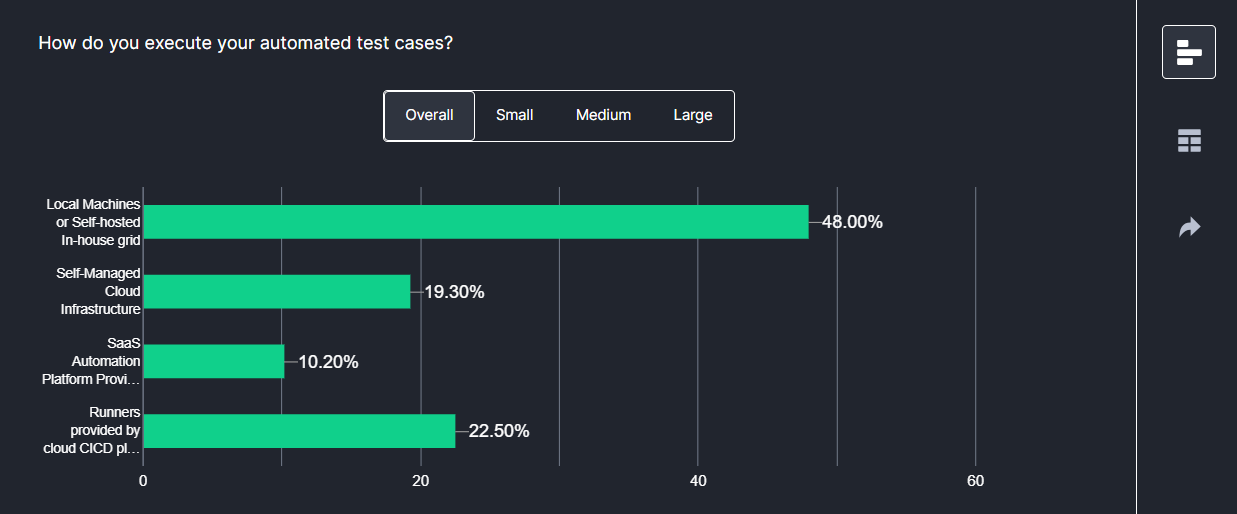
This is where a Cloud Grid gives you access to various real and virtual machines, each with its own configuration, operating system, and web browser. This guarantees accurate testing in various situations, an essential component of reliable software development. Additionally, cloud providers typically offer high availability and redundancy, reducing the likelihood of downtime during testing.
We recommend using the cloud-based testing platform that offers Selenium Grid setup on-cloud, such as LambdaTest.
It is an AI-powered test orchestration and execution platform that lets you perform automation testing at scale across 3000+ real desktop environments. It saves developers and testers from the hassle of maintaining our Selenium Grid setup and can focus on writing better automation code. LambdaTest also comes with the ability of Selenium Grid for parallel execution, all on the cloud.
Difference Between Selenium Grid and Cloud Grid
Let’s compare Selenium Grid vs. Cloud Grid to differentiate between their features.
| Features | Selenium Grid | Cloud Grid |
|---|---|---|
| Configuration | Requires manual setup | Offers automated scaling |
| Deployment | On-premises | On cloud |
| Scalability | Limited by available machines. | Remotely unlimited |
| Concurrency and Parallelism | Limited by available local machines. | Offers extensive parallelism and concurrency options. |
| Operating System Compatibility | Limited to the local network's OS availability. | Supports a wide range of operating systems. |
| Browser Variety | Limited to local resources. | Offers wide browser coverage. |
| Resource Control | Limited to local network | Accessible globally |
| Maintenance | Requires in-house management. | Managed by the cloud provider. |
| Geographic Reach | Local or limited to specific data centers. | Global availability |
| Redundancy and Failover | Reliant on local backup solutions and redundancy strategies. | Often includes built-in redundancy and failover capabilities provided by the cloud service. |
Running Tests on a Cloud Selenium Grid
LambdaTest is an AI-powered test orchestration and execution platform that offers an online Selenium Grid to perform automated browser testing in parallel. LambdaTest also offers integration with popular CI/CD tools, project management tools, codeless testing tools, etc., for a faster go-to-market launch. Check out all of the LambdaTest Integrations.
Follow these easy steps before running automated tests using Selenium with Java on LambdaTest:
- Create an account on LambdaTest.
- Once you are in the Dashboard, get your LambdaTest Username and Access Key by heading to your profile icon from the top-right and then navigating to Account Settings > Password & Security.
In the below test script, we will only modify the DemoClass.java file. Below is the Java test script that uses the TestNG framework.
The testng.xml file will also be the same as we have done on the local server. So, we didn’t need to modify it as usual.
Again, run the testng.xml file by right-clicking on it and selecting Run AS > TestNG Suite.
Our test case specifics can be seen under Automation > Web Automation. To learn more about the implementation, click on the First test.
Output:
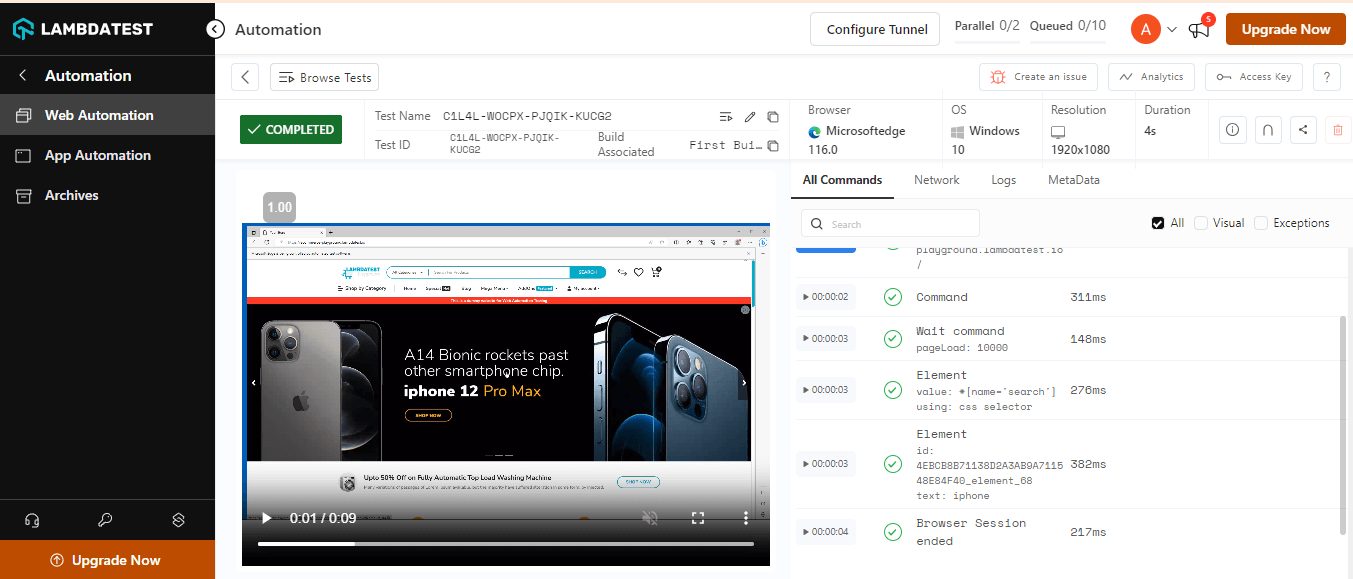
Code Walkthrough:
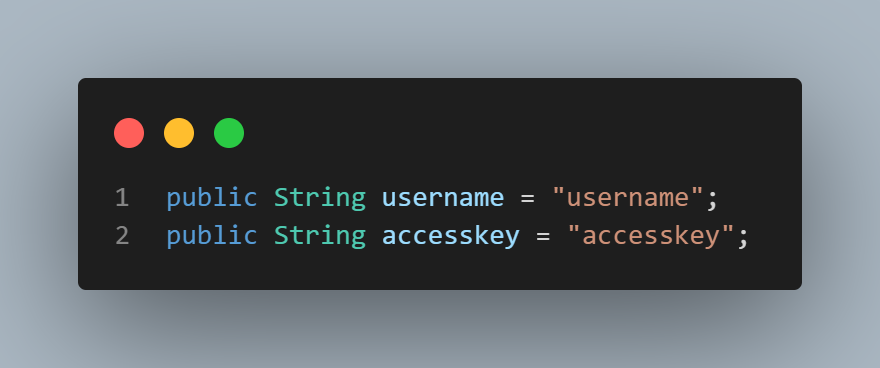
Provide the username and access key to perform parallel testing over the LambdaTest Cloud Selenium Grid.
Provide the remote URL for parallel execution over the LambdaTest Cloud Selenium Grid in the DemoClass.java file.

Now, we have successfully performed parallel execution on Selenium Grid across different browsers and operating systems without any hassle of creating a Hub and launching the Nodes on different ports.
While the test runs on a Selenium Grid, you can see the live video streaming of our tests (in the above LambdaTest Web Automation Dashboard) and various other details, such as commands, which include screenshots of each command passed by our script and the logs and exceptions raised.
Moreover, you can also create your team and run automated tests as a team. These test results would be visible to each member added to a team. In addition, through single-click integration, your teammates can log any bug found during their cross browser testing session directly to various project management platforms like Jira, Trello, Asana, Mantis, GitHub, etc
Shortcomings of Selenium Grid
In this section of the Selenium Grid tutorial, we will see some of the shortcomings of Selenium Grid.
- Complex Configuration and Setup: Configuring the network settings and maintaining proper communication between Nodes and the Hub can be challenging, especially for individuals with little to no background in networking. Ensuring compatibility between Selenium Grid, Selenium WebDriver, and browser versions can take much time and effort.
- Resource Intensive: Selenium Grid might be resource-intensive to run on several Nodes. To ensure smooth functioning, it needs enough CPU, memory, and network resources, which could raise the cost of the infrastructure.
- Compatibility and Stability Issues: Coordinating the WebDriver executables, Selenium server, and compatible browser versions can be complex. Unexpected behavior, test failures, or even system crashes might result from mismatches.
- Security Issues: Selenium Grid demands strong security measures in sensitive data settings. To protect sensitive information, secure communication protocols, encryption, and access controls must be implemented.
- Maintenance Costs: Maintaining a Selenium Grid configuration needs regular Node status monitoring, health checks, and performance enhancement. Many Nodes must be managed, which requires devoted resources and ongoing maintenance.
Concurrently running tests on several nodes may significantly strain the network’s capacity when Nodes vary across various physical locations. This can cause network congestion and slower test run durations.
Selenium Grid may experience stability issues under high demand, particularly when running many tests simultaneously. The stability issues may cause Node crashes or periodic failures.
Also, giving testers remote access to Nodes could cause security issues. Proper access controls and secure communication routes must be developed to avoid unwanted access.
Putting high availability failover measures into place for the Hub can be challenging. Careful design and configuration are necessary to ensure that a backup Hub smoothly replaces the primary Hub in the case of a failure.
Proper version tracking and prompt upgrades are necessary to guarantee compatibility between various browser and WebDriver versions across Nodes. Failure to do so can cause compatibility issues and erratic test executions.
Conclusion
Selenium Grid is used for parallel execution and is a potential way to minimize test execution time and maximize resource use significantly. Teams can generate faster feedback loops and improve their testing process by spreading tests across numerous nodes.
Selenium Grid can ensure that web applications perform seamlessly across diverse platforms, leading to a superior user experience. It is an essential resource for any software development team committed to producing top-notch, bug-free apps, whether it’s for cross-browser compatibility testing or large regression suites.
Frequently Asked Questions (FAQs)
What is the purpose of Selenium Grid?
Selenium Grid enables parallel execution of tests across multiple machines and browsers. Test cases are distributed among machines running various browser settings, making it possible to thoroughly test across platforms and browsers parallely, thus saving time and money when testing online applications.
Can we use Selenium Grid for performance testing?
No, Selenium Grid is primarily made for running functional tests concurrently across several platforms and browsers.
Although it can replicate a limited number of user traffic at once, it is not a tool specifically designed for performance testing. Specialized tools like JMeter, LoadRunner, or Gatling are suggested for thorough performance testing since they include load, stress, and performance testing features with in-depth reporting and analysis capabilities.
Do I need a Selenium Grid?
Yes, Selenium Grid can speed up your test execution by allowing concurrent, cross-browser, and cross-platform testing. It enables realistic load testing, facilitates CI/CD integration, and optimizes resource utilization. It ensures thorough test coverage for strong, high-quality web applications and is affordable and scalable.
How to run multiple test cases in Selenium Grid?
Configure testng.xml with suite files containing different test classes to run numerous test cases in Selenium Grid. To pass browser configurations, use @Parameters. Create Grid nodes and run TestNG tests to enable cross-browser and parallel testing.
Got Questions? Drop them on LambdaTest Community. Visit now


